> ## Documentation Index
> Fetch the complete documentation index at: https://docs.xynehq.com/llms.txt
> Use this file to discover all available pages before exploring further.
# Credentials
> Get Google Credentials for Login
Follow the instructions below to generate your google credentials :
## Setting up a project in Google Cloud Console
Create a new project in [Google Cloud Console](https://console.cloud.google.com/projectcreate)
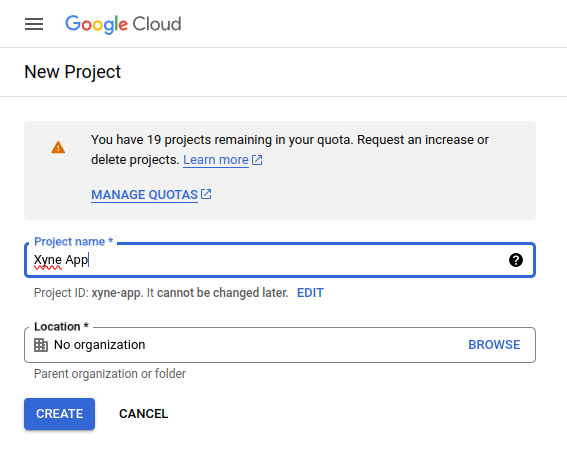 Switch to the new project you just created.
## Setting up the Oauth Consent Screen:
For a completely new project you will need to setup the consent screen before setting the credentials.
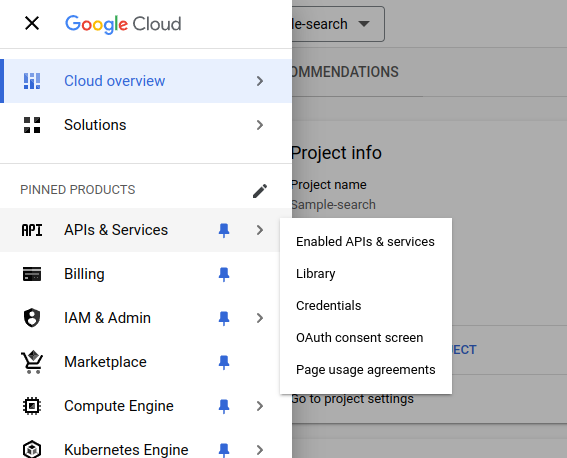
First step after creating the project is to setup the OAuth Consent Screen.
* For this navigate to the OAuth Consent Screen in the Sidebar of your Google Cloud Console :
Switch to the new project you just created.
## Setting up the Oauth Consent Screen:
For a completely new project you will need to setup the consent screen before setting the credentials.
First step after creating the project is to setup the OAuth Consent Screen.
* For this navigate to the OAuth Consent Screen in the Sidebar of your Google Cloud Console :
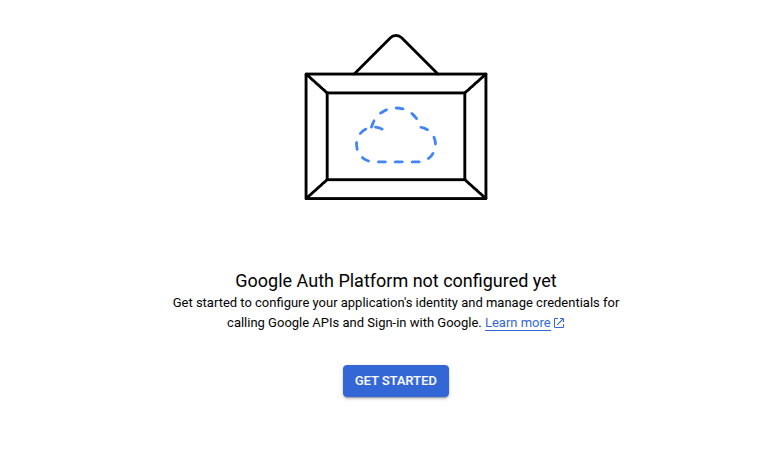
 * Under the Oauth Overview screen, click on `Get Started` button.
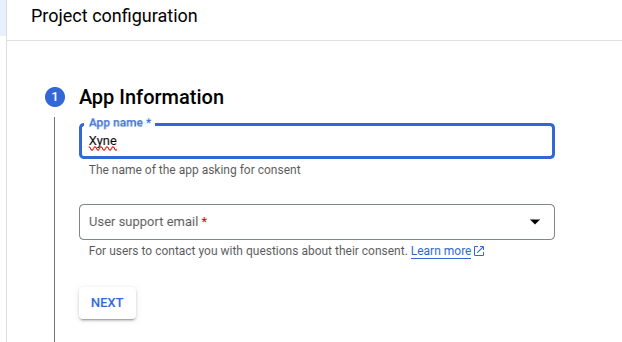
 * Under the `App Information` Section, fill out the details :
* Provide a Name for the app (For ex: Xyne)
* Provide a User Support email (For ex: [your-email@gmail.com](mailto:your-email@gmail.com))
* Under the `App Information` Section, fill out the details :
* Provide a Name for the app (For ex: Xyne)
* Provide a User Support email (For ex: [your-email@gmail.com](mailto:your-email@gmail.com))
 * Click on `NEXT`.
* Under `Audience` section select `Internal` :
* Click on `NEXT`.
* Under `Audience` section select `Internal` :
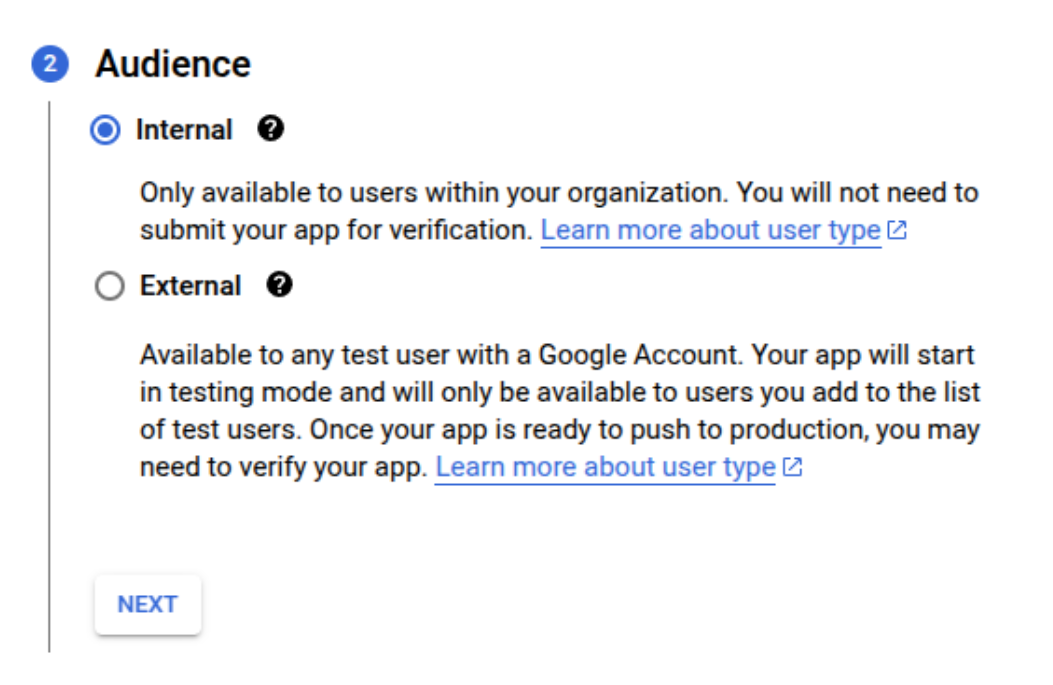 If you're using personal email, you can choose `External`.
* Click on `NEXT`.
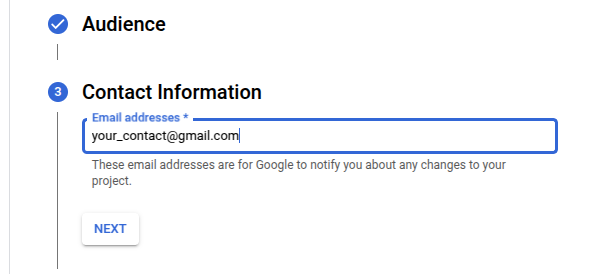
* Under `Contact Information` give the developer email. (For ex: [your-contact@gmail.com](mailto:your-contact@gmail.com))
If you're using personal email, you can choose `External`.
* Click on `NEXT`.
* Under `Contact Information` give the developer email. (For ex: [your-contact@gmail.com](mailto:your-contact@gmail.com))
 * Click on `NEXT`.
* Under the `Finish` section click on the checkbox to accept Google's User Data Policy.
* Click on `NEXT`.
* Under the `Finish` section click on the checkbox to accept Google's User Data Policy.
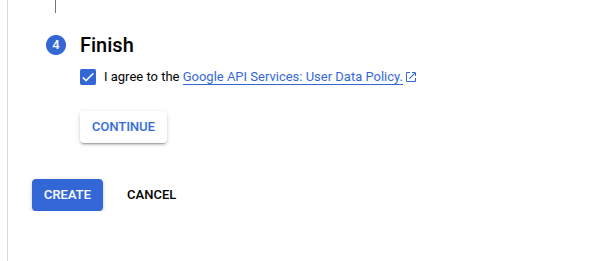 * Click on `CONTINUE`.
* Click on `CREATE`.
If you had previously chosen `External` in your `Audience` section, you can now navigate to `Audience` section again in the side menu and add your allowed external users in the `Test Users` section.
#### Setting Scopes :
* Now navigate to the `Data Access` section on the left-side menu.
* Click on `CONTINUE`.
* Click on `CREATE`.
If you had previously chosen `External` in your `Audience` section, you can now navigate to `Audience` section again in the side menu and add your allowed external users in the `Test Users` section.
#### Setting Scopes :
* Now navigate to the `Data Access` section on the left-side menu.
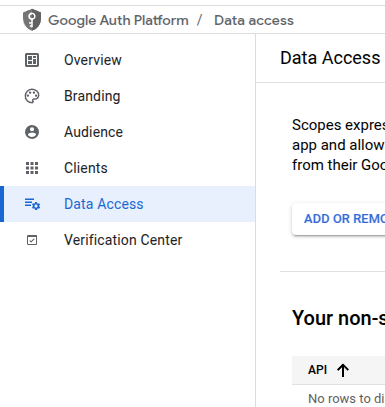 * Under the `Scopes` section you'll see the `Add or Remove Scopes` button. Click on that:
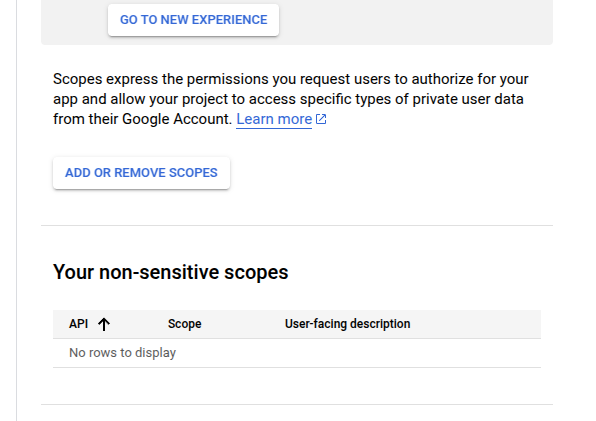 If you're going for OAuth Authentication you can set all the scopes using this part of the [OAuth Authentication Guide](https://docs.xynehq.com/authentication/oauth#adding-the-scopes-for-the-enabled-apis).
If not you can add the scopes mentioned below.
* For now in the scope section only add `/auth/userinfo.email`,`/auth/userinfo.profile` and `openid`, leave out the rest of it.
If you're going for OAuth Authentication you can set all the scopes using this part of the [OAuth Authentication Guide](https://docs.xynehq.com/authentication/oauth#adding-the-scopes-for-the-enabled-apis).
If not you can add the scopes mentioned below.
* For now in the scope section only add `/auth/userinfo.email`,`/auth/userinfo.profile` and `openid`, leave out the rest of it.
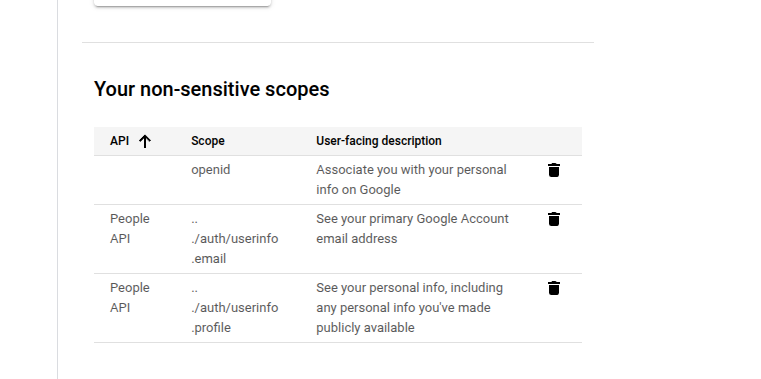 * Click on `Save`.
This concludes the setting-up of your OAuth Consent Screen
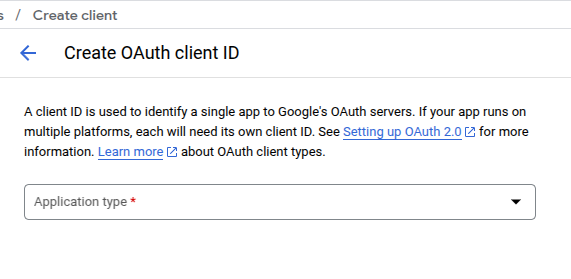
## Setting up the OAuth Credentials
* Now, under `Clients` section in the menu on the sidebar,
* Click on `Save`.
This concludes the setting-up of your OAuth Consent Screen
## Setting up the OAuth Credentials
* Now, under `Clients` section in the menu on the sidebar,
 * Click on `+CREATE CLIENT`,
* Under that you will see `Create OAuth client ID` option.
* Click on `+CREATE CLIENT`,
* Under that you will see `Create OAuth client ID` option.
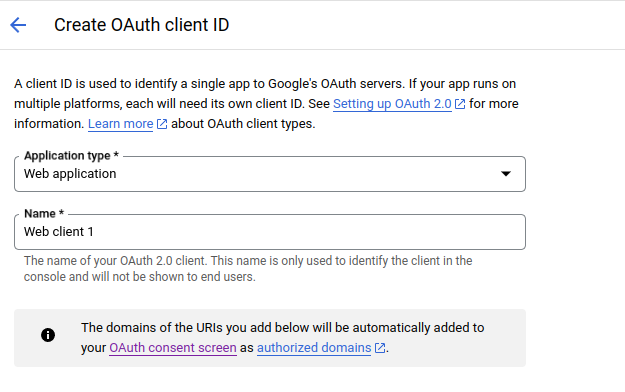
 * Add the type as `Web Application`, and give it a name (For ex: Xyne)
 * Add Authorized JavaScript origins as:
* `http://localhost:3001` for local or replace with `http://` for production.
* Add Authorized redirect URIs as:
* `http://localhost:3001/v1/auth/callback` for local setup or `https:///v1/auth/callback` for production.
* `http://localhost:3001/oauth/callback` for local setup or `https:///oauth/callback` for production.
Use `http://localhost:3000` as authorized Javascript Origins. Use `http://localhost:3000/v1/auth/callback` and `http://localhost:3000/oauth/callback` when using dev-mode.
Click `CREATE` and make sure to save the Client ID and Client Secret for putting it in the [`.env` of the application](https://docs.xynehq.com/quickstart#setting-the-environment-variables)
With this you will now be able to successfully login to Xyne with your google account.
You can use the following Guides to add your scopes for your project:
Authenticate with Oauth Account.
Authenticate with Service Account.
* Add Authorized JavaScript origins as:
* `http://localhost:3001` for local or replace with `http://` for production.
* Add Authorized redirect URIs as:
* `http://localhost:3001/v1/auth/callback` for local setup or `https:///v1/auth/callback` for production.
* `http://localhost:3001/oauth/callback` for local setup or `https:///oauth/callback` for production.
Use `http://localhost:3000` as authorized Javascript Origins. Use `http://localhost:3000/v1/auth/callback` and `http://localhost:3000/oauth/callback` when using dev-mode.
Click `CREATE` and make sure to save the Client ID and Client Secret for putting it in the [`.env` of the application](https://docs.xynehq.com/quickstart#setting-the-environment-variables)
With this you will now be able to successfully login to Xyne with your google account.
You can use the following Guides to add your scopes for your project:
Authenticate with Oauth Account.
Authenticate with Service Account.